Showing posts with label painting. Show all posts

Thursday, March 31, 2011

Kitchen Reno Report #3: Painting is Hard Work

I recently visited a former art teacher in her home and had one of those 'ahha' moments gazing at her walls. She's a brilliant visual artist and the walls in her home have become a canvas. On one she's drawn a fine black line that's eerily akin to the silhouette of a mountain range at dusk. Another looks like rough hewn cob, its drywall textured with a range of desert- inspired colours. Small details- like a group of unstable rocks set to 'drop' from above- add whimsy and delight.
I used a roller, and one swipe over the stencil did the job.
Her walls smashed my expectations that "two coats of the same colour paint shall be applied in equal thickness to all the drywall in one's home." (Can you tell I don't have cable TV? No doubt I'd find lots of out-of-the-box painting on the home channel- to striking and terrible effect!) All this to say that when it came to painting our kitchen again, I wanted to include some surprises too.

House painting is something I often discount as an 'easy' project. Unlike wiring 220 V, anyone can do it, right? Maybe, but its a helluva lot of work,  starting with the right paint colours. 

Because I hadn't kept record of the paint we used last time, I picked out similar-looking paint samples. Turned out, each tint I chose was just a little off from the original reno project. The cream cabinets were more brown than yellow, which looked nasty against the yellow walls and dirty against the red inset cabinets. I sprayed the the backsplash 14 times to get the colour right.  And though we originally planned to only paint the cabinets and backsplash- we turned out painting everything, sometimes twice and (in one case) three times. 

This wall is by our back door. I painted it with magnet paint (very cool), and then painted a 'white board' paint over top. Apparently white board markers are supposed to wipe off. Our first renderings of cats and weird alien creatures never did clean off- and so I painted over it all with white latex. $30 of white board paint = big waste of money and time.

Four year old Madi paints with her trusting, brave Daddy. It went better than I thought.

The kitchen was an early addition (the house was built in 1917, the kitchen probably was added in the 20s or 30s), we think the clapboard wall was once a covered porch... When we moved in, this wall was covered by cabinets. We ripped them out and found this bowed buffet and hutch at the Strathcona Antique Mall to replace the cabinet storage.


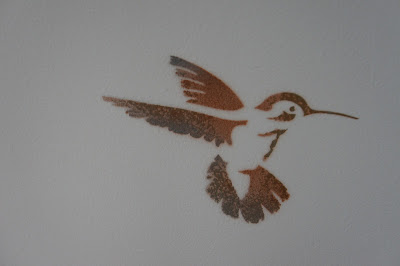
Stencils are tricky things- they are super personal. When we moved in, the front entrance way had stencilled grape vines scalloping the edges. It was the first thing we painted over. And now, I have become a little stencil crazy- liberally stencilling Ed Roth's bird designs all over my home.


So, from your perspective, is this sequence a picture of a bird rising or falling? 


I used both colours of spray paint from the backsplash, to colour these hummingbirds. The copper was the main colour then I lightly spot sprayed the silver on the feathers' edges.
This swallow is actually part of a larger series of them, coming up the basement stairs (from which I'm taking this picture). Someday I'll post pictures of the bird filled stairwell- but this guy escaped the stairs into our kitchen... and is about to dive bomb this Alphonse Mucha calendar print.


See the other posts on this kitchen's progress here

Thursday, March 17, 2011

Kitchen Report #2: The Backsplash

When we moved into our home we loved the kitchen backsplash. It looked like old-school tin ceiling tiles however on closer inspection, you realized it was raised wall paper with metallic paint. When we ripped out the kitchen, the original backslash inevitably got destroyed. So we wallpapered it all again and planned to repaint.


Of course, two years later it was still white. I didn't mind the white, except that it stained so easily and the matte wallpaper did not wipe clean from basic spills (you know, when the blender barfs smoothie? or when a jar of tomato sauce smashes on the quartz counter tops?)

In our quest to Do It Right (see the past blog posts here) we washed the wall paper as best as we could. We taped everything well, took off the electrical covers, and secured newsprint over the whole counter. Despite our best efforts, we ended up doing this twice!

In the end, our problem was  one of aesthetic. While I loved the copper on its own, I didn't like it against the red sections of cabinet. AND I LOVE RED. I couldn't part with it, so we painted over the copper with hammered silver. Even though its darker than I hoped, there's no way I'll spray again any time soon.

Spray paint  was the only type of paint I found that promised the 'hammered' metal look. For a 60 square foot section I used 4 cans of copper Rustoleum paint (and one face mask) from Home Depot. This was BY FAR a better brand then the second one from Canadian Tire. It didn't cover as much with one can, however it went on more smooth and the trigger was really comfortable. Laugh at that, but this matters after painstakingly spraying 7 coats in 2 hours. The second brand's traditional spray top meant I couldn't use the tip of my finger for a couple days after -- seriously, I couldn't type without grimacing.


Sorry for the bad light. The Rustoleum can on the right was easily worth the extra $3/can.
Over all, I'm happy with how it turned out. Its an affordable way to get a traditional look and, from what we know from living with the original backsplash for a few years, should wear really well.

Overall Costs:

$30- wall paper
$40- copper paint
$27- silver paint
7-     aerosol cans to the eco-station
a few- brain cells
30 min- prep
2 hours duration- spray time

Wednesday, March 9, 2011

Kitchen Report #1: Reno Take 2

Following up on my post Doing it Right the First Time, we are nearing the completion of our kitchen project- three years after renos began. Oh the last couple weeks have been painful! Mat asked at one point, "Were we anywhere close to 80% done?"

This is why we don't finish things- the little details are a major pain in the derriere.

Crown moulding, fiddly painting, removing wall sockets, connecting lights. We've procrastinated on this stuff for a reason: its fiddly and doesn't quite have the KAZAM of new cork flooring, efficient shiny appliances, and countertops. In fact, all this work and most of our guests don't seem to notice right away that anything is different.

But the truth is, I notice. One of the finished details I'm most excited about is our cabinets.

Mat built the cabinets around the fridge and stove from scratch and we saved what we could of the original base cabinets on the east wall. While this method we saved money and landfill space, we've had some troubles: a couple of the doors never closed right and the paint chipped after only a year. This stuff bugged us both on a regular basis- and now, after much cursing, it is fixed it!

We kept all the base parts of the original cabinets on the wall to the right. Mat then had the tricky job of making doors for both new and old sets of base cabinets. This was his first time with such a project- pretty handy guy, eh? 

Note the speakers at the ceiling flanking the microwave? They were the first thing on our list of 'additions'. Best call we could have made!

Mat rejigged the cabinet doors so they close perfectly. We also (with the help of my dad) re-painted the cabinets with a low VOC paint.  This time we decided to pre-meditate the chipping and finish it 'antique'. This meant painting the fronts with a coat of bright blue, then two coats of cream, then sanding the 'worn bits'. I then did a coat of 'white wash'. I love the white wash effect- its an easy way to add depth a painted surface and softens the colours.

What do you think- should I add a final layer of wax to buff them a bit?

 To white wash:

1. Mix 8 parts water with 1 part white (or any colour) paint
2. Using a rag and literally wash the surface
3. After a couple minutes of dry time, go over the area again with a clean, dry cloth to smooth out the streaks
4. Repeat if necessary.


The finished look isn't for everyone, but I think it suits our kitchen perfectly.

Thursday, February 24, 2011

Doing it Right the First Time

In my stocking, this year, I got a fridge magnet. It read:

Why is there never time to do it right, 
but there's always time to do it twice?

Yeah, yeah, yeah. Is it a bad thing that my "style" blares from the bold font of a kitchen knicknack?

A couple summers ago, Mat and I bought a cool (cute) old school (looking) scooter from a couple in St. Albert.  Their house was pristine. Their garage- OMG- their garage!! All walls had those metal cabinets that fit snuggly together; there wasn't a rogue screw, tool or pipe to be seen. In fact, I saw not one drop of oil or varnish staining the scrubbed cement. 

Every time we visited (we ended up there three times) the couple invited us in for drinks. On our second visit it came up that we struggled to finish things. Scooter Man tisked and shook his head wildly, "No, no, no! You MUST finish things 100%. It's imperative for your financial and emotional health." 

I'm not sure what he knows about emotional health, but certainly financially they had done very well.

In the couple months that followed we reflected often on his horrified expression and encouraging coaching- is 100% even possible for our two laid-back, attention deficit personalities?

As we stepped back to assess, we saw that we finish most things about 80%. We take out the garbage- but only to the back gate (then it all piles up in a stinking mess until we finally think to take it the last 20% to the alley). We paint the walls, then grow tired before we finish the sanding and painting of the trim. We put new flooring in the upstairs, and leave nailing on trim to 'another day' which never does come. 

Last year we took on the project of our front entrance way and determined to finish it 100%- meaning every hook needed to be screwed in, back stop installed, bench stained, paint complete, pictures hung. And did it! It took us a couple more days than planned- but we did it.

As we've continued to encourage ourselves towards finishing things (and finishing them well!), I think the most significant obstacle to this is the way we budget TIME. We never give ourselves the time to finish. Projects always go longer than expected, the garbage always is taken out as we're late for a meeting. (Some might say we also don't consider 'cleaning things up' to be a huge priority.) 

This last weekend, I had a hankering for a project. I wanted to paint our dining and living rooms plus add a plate rail and built-in book case. As we planned the budget and shopping list-- we looked at each other. Memory of Scooter Man was shouting in my ear and I took a tentative glance at our kitchen.

It's been 80% done for 3 years now. How could we start another project with the kitchen sitting awaiting some lovin'? So we pulled on our Responsible Adult hats, set our faces to 'grim', and started the nasty job of sanding cabinets, re-jigging doors and adding ceiling trim.

Hopefully this post isn't just a form of procrastination (from the cutting in currently needed on the cabinets). Its a public declaration that: I really will try to finish things better.

Mat does the curse-incurring work of ceiling trim.

The cabinets Mat build (saving some of the base cabinets on the right wall), but the paint has begun to peel. Also a number of the bottom doors never have quite fit. There is some problem-solving required!

The backsplash is wallpaper--- and we always meant to spray it a metallic colour. Then we didn't and its gotten gucky, grey and stained, of course.

The inside of the cabinet Mat is painting was never painted (we even painted 80%!). Now, we're painting it all. The blue is actually an undercoat to be covered with 'navajo white'. We think that if we "distress" or "antique" the cabinets- more on that later- we may not have to worry so much about stripping paint in the future. Maybe?!?