Tuesday, July 27, 2010

Action in the Squash Patch

                       
For members of my household who love pumpkin pie and butternut stew, 2009 was a disappointing year. Total number of winter squash: 2. I gleaned one Buttercup and another Spaghetti squash from six large plants. It was a lot of green square footage producing a whole lot of nothing.

After some sleuthing and input from my squash-crazy sister-in-law, we’ve deducted a pollination problem. In 2009, I had plenty of flowers and the fruit would look like it was growing then instead yellow and die.

This year, I have taken matters into my own hands and started playing ‘Birds and Bees’. The first thing to surprise me was the sheer number of available male flowers and the woeful number of willing female compatriots. The ladies are more inclined to draw their virginal petals up demurely around their centre and remain like this most of the day. In my patch, fruit-making action happens exclusively in the mornings.

So if you share my problem, or skipped the Bio class where they taught this stuff, here’s how you can increase the conception rates in your squash patch:

1. First, figure out who’s female and male. The female flowers blooms from what appears to be a miniature squash. They look like they’re growing from a new fruit while the male flower buds burst from a long, narrow stem.
Male flower easily distinguished by its continuously narrow stem.

Female flower blooms from a miniature squash.


2. Once you’ve got the sexes figured out and you chance upon both types blooming (as previously noted, this is most likely in the morning), pick the male flower. If you’re low on guys, one flower should pollinate 2-3 females.  Then, I couldn’t think of a way to write this better, so I quote from an ehow.com article:


3. “Gently pull away the petals of a male flower to expose the stamens and insert the male flower in the female flower to add pollen. Be very gentle!” http://www.ehow.com/how_5036967_hand-zucchini-winter-squash-pumpkins.html


4. If your hand gets tired, or you don’t want to bruise any male flowers' petals, try my sister-in-law’s advice: a vibrating toothbrush is the squash patch’s equivilant of Don Juan.

5. Now, sit back and watch the squash grow, though don’t get lazy with the watering. 

And, perhaps you shouldn’t let those male flowers go to seed. Start eating them, they are the rage in Italy. Even in Canada, male flowers can cost you a bundle at a farmer’s market. In this week’s Taste Section in Maclean’s Magazine, Jacob Richler reported buying eight squash flowers for $6.99 in an uptown Toronto greengrocer. He suggests you stuff them with ricotta and herbs, then dredge in flour and soda batter, next fry and serve over tomato sauce. "Nature's ravioli!" he writes.

For my first experience eating a squash flower, I kept it simple and used a recipe that my Italian neighbour passed on. A suspect idea that was the ultimate breakfast- almost better than waffles with fresh raspberries and cream.


 Squash Flowers ‘a la French Toast’

1.     Pick the male flowers when they are fully open (best in the morning).
2.     Wash. You can keep the centre stamens in, or pop out the centre. There are slight prickly spines on the outside of the flower that you can leave or remove (they aren’t hard to remove, though you run the risk of ripping the leaf- which I did).
3.     Cover flower with flour.
4.     Swirl floured flower in egg.
5.     Fry in hot oil, adding salt, pepper and spice of your choice.

Daughter Lily's first encounter with battered squash flower.
We're heading camping, but next month I report on cooking and consuming squash leaves. As well as, we'll see if I actually get my DIY solar cooker up to 200 degrees F. 


Tuesday, July 20, 2010

My Faithful, Long Suffering Aprons


Ten years ago I opened a gift at my wedding shower, inside was a denim apron complete with little pleats around the waist and elastic tensioned pockets.  It was a masterful bit of sewing that took me years to appreciate.

Unlike the mother on 'Leave it to Beaver' reruns, my mom rarely put on an apron in the kitchen, garden, or garage. Though I don't recall putting one on there were aprons in the house, lost in the abyss that was our linen cupboard.  

Aprons (despite growing popularity as a chic fashion accessory) are attached, in our collective consciousness, to home economics of the 50s, when perfect moms wore fancy aprons overtop equally fancy dresses and accessorized by heels and large clip-on earrings. 

Not a bad style for the privileged time, but oh how the perfect fall. That fantasy of the perfect mother has been slashed and scorned, her bra has been burned.

Surely the mothers of the time knew of the illusion and that it couldn't last, but its an unfortunate thing we threw out the apron with whatever Mrs. Cleaver sold us. Since my apron-less childhood, I've learned to embrace the garmet (though it more literally embraces me). How can one not love such a useful piece of material? It has no prejudice for gender or profession. Butchers, gardeners, cooks, secretaries and craftsmen, even school-children, have donned the lowly apron for its finer qualities. Namely, it stops blood, guts, bugs, dirt, and sludge- in fact spray of every kind- with surprising faithfulness. 

An apron also gives its wearer a certain aura, one of productivity, committed-ness, and skill. In fact, I think that a dirty apron can actually increase people's respect for the wearer. For example, imagine neighbour Jane at your front door in her dirty garden apron. "Dirty" isn't the first word that pops into your mind. Instead, you probably would describe a hard-working gardener who is serious about her craft. 

There's another lovely thing about aprons: they breathe authority. Enter a kitchen to inquire about helping, who do you ask? The woman at the stove or the man wearing an apron at the sink?  Okay, that may be a hard one. How about if it was a woman with an apron at the sink? The lady with the apron gets the question from me every time. Unfortunately, the male head cook with the apron will, nine times out of ten, be mistaken for the BBQer.

Men have quite a ways to go in reclaiming their pride in donning an apron. From my experience, men probably could benefit from aprons more than women. My father-in-law, a renovator by trade, gets about four wears out of a new shirt before it becomes a 'work shirt' (or a rag). Sure at Home Depot the male staff seem unapologetic about their orange canvas, fully bibbed uniforms with their name Sharpied over their heart. Perhaps this is evidence of a great step ahead in the relationship of men and aprons, however a quick review of books on the subject reveals that they still appeal mostly to women. And unfortunately the apron's merit as laundry-savers and personal hand towels tend to be overlooked in favour of their merit as a fashion accessory. I'm all into accessorizing, but accessorizing with caked on chocolate chip cookie dough and my child's sneeze remains? 

So here's an introduction to a few of my well-used aprons. They are accessories, but of a different kind than Anthropologies' $44 (and oh so enviable) feature. They have saved my many black outfits from flour and my jeans from dirt. They act as immediately accessible hand towels, mops for the fast spreading milk spill, and kleenex for those moments I emotionally disintegrate over a minor mess. They have been trusted partners in finding joy in the daily grind. 
 
The first apron I owned which, at one time (before aprons were chic again) I might have called frumpy but now I could call it "sweet". 

I bought this apron from ebay; the sweeping shoulder straps form pockets at the hip. I love the look and feel of the wide back strap.  


My favorite apron, this was part of a multi layered hemp skirt from my sister-in-law. It is looking strangely discoloured because, for the photo shoot, I pulled it off the clothes line in a rain storm. I wash it once a week and it saves me at least a load of clothes over that time. 
This half apron I made out of reclaimed material from the ReUse Centre (orange top) and a hemp skirt (brown bottom) that was too short for me. The key to frequently using my aprons is easy access. This hook is in my line of vision so that I'm never tempted to start cooking without it.


Tuesday, July 13, 2010

Aroooogala lalala

This summer I have discovered the perfect compliment to summer heat- that leafy Italian green ‘arugula'. It’s the first year I’ve grown it in the garden and I’m hooked- the flavour, the texture, its versatility.

Arugula is an extremely spicy green, without hint of bitterness. The young leaves have the texture of soft cheese and like spinach, you can eat it fresh or steamed.

Across our alley, an Italian family has lived for the past 40 years. The Mrs. is a wealth of information on the Italian culinary arts. She has  maintained a large garden up until this year when she decided it was time to  let it go to seed.  Odd looking weeds took root. When I asked her about these she said, “It is Aroooogala.” Apparently, if allowed to, it self seeds copiously and successfully overwinters.

Even now in the heat of summer, it’s not too late to plant. Sow the seeds in a partly shady spot (under a tree could  work if there is dappled sun.) Mine is planted to the north side of my neighbour’s garage and after only four weeks its ready to harvest.  Because it bolts quickly, you should succession plant every few weeks starting in May and into the fall. If it does bolt, collect the seed to re-sow or use the seed to flavour oils or sauces.  In fact, according to Cambridge World History of Food, the seed (AKA Rocket Seed!) has been used as an aphrodisiac since the first century. Is there a better reason than that to eat it up?

Here are some recipes to savour while soaking in the sunshine.

Arugula and Parmesan Pasta
This recipe comes from my neighbour; it’s exceptional cold or hot.
1.     Cook up some pasta and in the last 2 minutes of cooking add available arugula leaves to the pot.
2.     Drain both pasta and arugula. 
3.     Pour into a large serving bowl and mix in your favorite oil (flavoured or plain).
4.     Add grated parmesan.
5.     Add chopped fresh or sun dried tomatoes.
6.     Sprinkle in salt and pepper to taste.

Arugula and Tomato Salad
If you cut everything very small, this makes a great bruschetta and is good fresh or broiled on toast or crackers.
1.     Dice tomatoes.
2.     Add chopped arugula, mild purple onion and bocconcini (the fresh mozza balls from the Italian Centre).
3.     Mix dressing: 2 parts oil, 1 part balsamic vinegar, squirt of lemon juice and salt and pepper to taste.
4.     Pour dressing over veggies and cheese and toss to coat.  
NOTE: If you let it refrigerate for an hour or two, the flavour is even better.

Arugula Veggie Pizza
1.     Roll out pizza dough.
2.     Cover with tomato sauce and sprinkle with basil, salt, and garlic powder.
3.     Cover sauce completely with arugula.
4.     Sprinkle with mozzarella and parmesan cheese.
5.     Top with favourite  veggies (olives and onions recommended)
6.     Bake at 425 F for 18- 20 minutes until dough is golden and cheese is bubbling.
7.     Add fresh tomatoes.

Tuesday, June 29, 2010

Green Clean- Recipes for Everybody


When I first set out to make my own cleaning products, the greatest inhibitor was logistical. When the spray bottle emptied, anxiety set in. Now I would have to gather the various ingredients from opposite ends of the house, pull out the recipe from yet another corner, then make the stuff. It seemed more of a production than it was worth. 

Then came the birth of my 'Green Clean Kit', and my family was saved my whining. 


To make a Green Clean Kit, find a crate (a green or blue bin works great) and fill it with the items pictured above:

1. Vinegar 
2. Baking Soda 
3. Castile (ex. Dr. Bronner's) or Pure Glycerine Soap (buy at Grocery/Health Food Store or Online)
4. Oil (olive or otherwise)
5. Borax (found in Laundry aisle)
6. Washing Soda (found in Laundry aisle)
7. Tea Tree
8. Rags

With these ingredients you will be able to make most of the homemade recipes available on the internet or plethora of books on the subject.

To be honest, I use only two recipes for just about every cleaning emergency. I have numerous spray bottles around the house, most marked in Sharpie with the recipes so everyone in the household can make up a new batch of cleaner.


General Purpose Cleaner
(For use everywhere, but on marble. If using on mirrors, experiment with amount of soap.)

1 Cup Water
1 Cup White Vinegar
1 teaspoon Castile Soap (or detergent if that's what you have)
5- 10 drops Tea Tree Oil (optional antibacterial)


Disinfectant

2 Cup Hot Water
3 teaspoons Borax
3 Tablespoons Castile Soap (or detergent if that's what you have)
3 Tablespoons White Vinegar

More oversight is required of this one if kids are cleaning. Borax is a natural mineral, however use it carefully as its highly toxic for animals and children. It is used here for its disinfectant properties in place of bleach.


I've also stumbled onto super cheap liquid hand soap!  Use 1 part Castile Soap to 7 parts Water. Works like a charm and for pennies (okay, maybe it'll cost you $1 to fill a standard soap pump).

Happy Cleaning, Guys, Gals and children of all ages. 

An Update- Square Foot Gardening in Edmonton's 2010 Season

(Check out the Square Foot Gardening Label for more square foot gardening in Edmonton.)


Being so far north, one would imagine that our summer here in Edmonton is as short as our winter is long. But not so fast, oh-prejudiced-one-against-northern-communities, Edmonton's got a longer season than Calgary (which counts for a lot as we shiver through the winter, cursing our lack of warming chinooks). Edmonton's frost free date this year was May 2. I planted broccoli, spinach, some carrots, peas and chard at the very beginning of April, and I optimistically planted out my beans, corn and tomatoes May 9.

June 2, snow and frost! Grrr, northern communities be damned.

Well, I and the rest of my plants survived the cold and rain of spring, but its sure been slow going for my little garden. Around mid June I added extra compost and some all purpose fertilizer to give the plants a boost that the weather couldn't or wouldn't. 

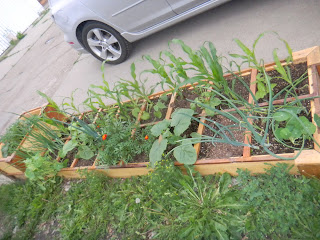
Here are my boxes, pictures taken around the middle of June:
The Spinach and Garlic actually overwintered (above ground!), the peas along the fence have desperately persevered mowing by birds. In the nearest corners are marigolds, seeded in other parts of the garden from last year, then transplanted here this year.


Again, garlic has overwintered successfully, as did the lettuce. I have tried planting onion seeds (not sets) in this bed, but they are desperately slow.  Beets and carrots are in the empty squares, tomatoes and cukes are at the back.


This year, I used this box as a cold frame. I planted my broccoli, alpine strawberries, marigolds, strawberry spinach and some lettuce in this bed early April, then when the weather got cold I covered it with a blanket or tarp over the pvc pipe and held in place with bricks. I transplanted all of those seedlings to other, more appropriate parts of the boxes and gardens. It worked so well I will add another cold frame set up in 2011.


The transplanted broccoli is a new crop for me... Peas are growing at the back of each square to cover the lattice, and carrots are planted at either end.


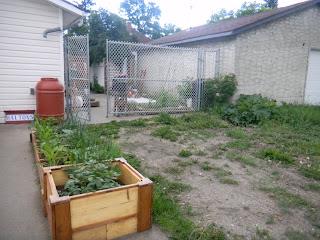
A new bed to compliment a weedy back alley! Mat built this bed for a demonatration we did on square foot gardening in May. He bought two 10 foot, 1x6s then cut it to make a 2x8' bed. He then added the 2x2' potato box at the end, which has a false bottom so its only 1 foot deep (I wanted the aestetic of this part being higher). Then, creative guy that he is, he fancied it up by adding cedar trim. The box cost us $10 since we had the screws, stain and trim.

In seeding it, I experimented with the familiar companion planting 'Three Sisters'. One row is planted with corn and beans (3 corn and 1 bean to every square foot), the second row is squash, marigolds, onions and nasturtiums (to trail along the front). In the higher section I've planted 16 seed potatoes in 4 square feet, with a depth of 1 foot.  

Here is the new bed, as of June 30:


The potatoes are doing really well; I now must add more dirt. 

This new bed has proved to be in an excellent position. Lots of sun, lots of reflection off the cement, easy access to the rain barrel. I think I may have to convince Mat to build four more beds to stretch across the 'guest parking spot' affectionately known as 'dandelion cove'. The dandelions may serve as excellent ground cover for all my aisles!


Monday, June 14, 2010

Hanging my skivies

Our new dryer was replaced with a second model exactly the same as the first, after four months of me complaining to customer service that the dryer didn’t dry my clothes. I was informed that these new LG dryers were set up to not dry clothes completely- so to save wear and tear on fabric.  Silly me, I could not accept this idea that I hang my clothes to dry AFTER placing them in my $800 dryer.

Turned out that the second dryer was the same as the first. Back to the warehouse it went and the nice folks at LG were going to send us a third dryer, exactly the same as the second, when Mat called and said, “No thanks, we’d like a refund.”

“Sir, a refund can’t be issued until your machine has been logged in our warehouse database.”

Fine. That tiny step has taken over two months. We have been without a dryer for TWO MONTHS! My whole life, I have been an avowed dryer- advocate. Sure I’ve been known to use the clothes line on those picture perfect ‘clothes line days’ when nostalgia gets the better of me, but at the sight of rain or a busy day I non-apologetically use the dryer.

Until two months ago that is. Surprisingly for such a dryer addict, I report here that using my clothesline and indoor drying rack has presented a shocking number of positives:

1. Everything in our closets is folded! It’s much easier to fold items directly off the rack because they have dried partially folded. I’m ashamed to admit that with my dryer I regularly pulled all the items out into one knotted mass in the ‘clean’ hamper. We then proceeded to dress from this tangled mess.

2. Having such a clear visual of every piece of fabric in our home hanging in the back yard, I am more aware of our family’s clothing inventory. Therefore, I buy fewer clothes. Even a $1 skirt at the thrift store isn’t worth the increasing my laundry pile.

3. My clothes, especially my thin cotton shirts, aren’t nearly as worn out. And at press time I have shrunk zero of Mat’s wool sweaters.

4. Lily’s diapers, Madi’s paint shirts, and my whites are stain free thanks to Mr. Sun.

5. Our towels have morphed into beautiful pumice stones! Due to the crisp air-dry our towels receive, my skin has never been better exfoliated.

6. We’re forced, in a good way (as in, I’m not resenting it yet), to be on top of the laundry. In our past days as dryer-owners, we often had washdays on Sundays. Eight loads through the machines, few folded. In this current regime, there is space for three washer loads on the line and rack that means we do the wash every couple days. I’m not nearly as daunted by the laundry as before when faced with piles of textiles from every closet in the house, barfed out at the foot of the basement steps.

7. I’m saving some money. Granted its not really a lot considering the time it takes to hang a load of wash (approximately 5 minutes per day). The clothes dryer is typically the second-largest electricity-using appliance after the refrigerator.  It costs about $85 to operate annually, so I’ve saved $14. Or rather, I’ve paid myself $7 for 2.5 hours of labour per month… 

8. But how can I quantify the spiritual benefits? I’m not a smoker, so there are not many times when I take a break to breath in some fresh air, release some tension in my shoulders, and pause. Hanging the laundry has been just that for me. It has offered me opportunity to pause.

And in those times of pause, I’ve been faced with the fact that my dishcloths are in disgusting shape. The whole lot of them must be purged.

And so, until we buy another dryer and I resort to my old habits, I will continue to hang my clean laundry while wondering if the neighbourhood boys are laughing at my knickers.


Monday, June 7, 2010

On Gentrification in the Urban Centre

I post this here because acts of Urban Homesteading are impacting, and will continue to impact, communities and neighbourhoods in the city. It's an important wrestle for anyone homesteading in areas where revitalization is occurring.


The font screamed from the lamppost, its capital letters in heavy black Sharpie: “GENTRIFICATION IS THE NEW COLONIALISM”.

I liked how this simple, succinct statement of withering contempt made me think. I liked the challenge of it. I marveled at how the use of five words can so swiftly turn a dialogue into a big, bloody battle.

Gentrification is a word that digs back into English history and refers to the gentry or ‘landed people’. It is used today to describe the middle class’s return to the centre of the city to live. It is usually used with a negative connotation.

“What’s so wrong with people who have money, power and education?” You ask.

Besides what’s wrong with most people- occasional bad humour, indigestion, and secret families- the fear is less about them as people and more on their impact on the most vulnerable residents in a neighbourhood. The fear is that the middle class move in and- well- there goes the community. Literally. No one else, but other middle and upper class people can afford to buy or rent the houses that have ‘desirable neighbourhood’ price tags attached.

Of course, gentrification doesn’t happen over night in a neighbourhood with significant crime and social upheaval. Gentrification happens in spurts over time. The amount of time it takes and number of times properties change hands is different in each city and region. And it’s hard to say when gentrification is complete. Is it when everyone has the same income? When everyone has the same values? When bylaws are introduced to forbid clotheslines?

As long as there is free market and free movement of people, the city’s neighbourhood demographics will change. In the 50s, our neighbourhood began to see significant movement of people away from the centre. The suburbs were being built in earnest and they were more attractive, affordable and accessible than ever before. My grandfather grew up in Alberta Avenue (his father owned an appliance store on 95 Street), and in 1948 was part of a new church plant. All of the twelve families that started the church lived in the neighbourhood however by 1970 only one member of the congregation still called Norwood home. This was a significant time of transition for many in the community. People moved for all sorts of reasons, and in their place investors purchased homes that often quickly deteriorated. Locally owned businesses closed or moved to more prime locations, leaving gaping holes in the landscapes of 111 and 118 Ave.  Churches closed or reinvented themselves as commuter churches. Many of the new residents were the working poor or newcomers to Canada and were often caught in cycles of poverty- preyed upon by slum landlords or greasy drug dealers. By 1970, the increased presence of the sex trade in the community further stressed market values and community optimism.

This was the story across North America’s city cores. However, for some time now, the trend is changing. With the onset of ideals of the New Urbanism, the city is no longer viewed through the lenses of rat infested, polluted Industrial Revolution cities (Charles Dickens impacted our neighbourhoods more than we give him credit!). City living has become desirable for its own aesthetic and quality of life. And there are other advantages: shorter commute means more time with family and friends, better access to city cultural events and public transportation.

Here in Alberta Avenue, the gentrification trend was clearly also fuelled by a red-hot real estate market through the early 2000s into 2008. In 2007, the inner city areas in Edmonton were the only areas you could find a single detached home for under $250,000. As the market climbed, many people began to worry that they would never be able to get into the market and so they bought whatever they could. And it often meant living in an area that for years had been maligned by parents or feared by classmates.

My husband and I have lived here since 2004 when we bought our first home for what my family thought was an exorbitant price considering the address ($130,000). We moved here to be close to our work and so that we could live alongside neighbours with diversity of background, culture and class. I love the cheap espresso at the bakeries. I love the easygoing atmosphere of the library. I love our boulevard trees. And depending on the renovation schedule, I either love or hate my home.

In all of my coming and goings, I am keenly aware of my role in revitalization and my fear of contributing to gentrification. I’m not sure where our family fits (and there aren’t any gentrification centres that determine its parameters), but we earn a middle class salary, own a vehicle, and have university degrees so I think I may be a threat. Will planting flowers in my back alley just make the neighbourhood prettier, hence more attractive for a prospective home buyer who turns the rooming house across the alley into a single family dwelling which in turn displaces six people? Perhaps I shouldn’t plant flowers, or paint my fence, or walk my dog, or have a coffee on the porch or… I might just negatively impact the city.

It’s like ‘gentrification’ is some wild, giant boogeyman that might snatch my children or feed on my liver… Or worse still, it will feed on really poor children’s livers.

TV dramas thrive on this stuff:

Scene #1- Young woman runs wildly from the dark alley. She screams: “They’re coming, in a huge Mercedes with house plans the size of a meteor.”


Scene #2- Senior man in a wheel chair wearing a ratty cardigan weeps at his kitchen table while his super rich landlady drums her manicured nails on the counter and barks, “You’ve got until tomorrow to find another place. I’ll take the keys now.”  The camera zooms in on the five year old’s iphone as she watches Hannah Montana.


Satire aside, I don’t want to undermine the injustice that displacement of already vulnerable people can cause. I’ve worked with families facing few options in life and it is a painful place to be. In my opinion, however, the primary challenge in looking at revitalization through the lens of gentrification is that we begin to read situations and meet people from a primarily classist perspective. Surely being aware of one’s privilege is critical in being a more empathetic individual that in turn makes us better neighbours and friends. Certainly being conscious of one’s impact on one’s neighbourhood is critical for building holistic communities. However looking at everything from a class perspective undermines the strengths and options that many in the low-income bracket might have to offer.  People are people are people; we’ve got strengths and weakness that we have to live and work together with.

From my experience, how people use their personal power is more critical an issue when building healthy community than income level and class ever is.

Class, money, power, and education when used for personal gain will create individualistic and distant neighbourhoods. If used for good, however, these things can create profoundly sustainable, connected and diverse communities.

So, instead of fear mongering and class-dissing, let’s starting talking to people about what their dreams for this neighbourhood and their families are. In the course of our community and city’s history, this is a unique time. The local economy is growing, there are grassroots initiatives beginning, my grandfather’s church has new community residents joining the congregation. The neighbourhood is experiencing an upswing.

Just how far upscale should we justly let it go? 


Sunday, May 30, 2010

Making Dandelion Coffee

Weeds have a bad reputation and perhaps fairly earned. Just when you think you’ve pulled the last seedling of quack grass, chic weed, dandelion or lamb’s quarters, another pops up from the ground and innocently waves, “Over here baby cakes.”

They are resilient, prolific, aggressive and driven bleepity-bleepers (minus that last part, they sound a lot like the financially successful people I know). Weeds threaten our prettier, more tender plants and drain our already busy schedules.  Plus, we’ve been acclimatized to think prejudicially towards them- they are ugly, smelly, good-for-nothing curses from the earth.

There is a small but growing contingent of people who would like us reconsider our hate-on for the weeds in our yards. These folks suggest that perhaps the Earth has gifted us with these tenacious plant-fellows, to be used as ground cover (Johnny’s sells Dandelion seeds by the thousands for this purpose), or salad dishes, nutritional supplements, or fertilizer.

In case you I haven’t heard about the wonder plant, ‘Dandelion’, here are some of its benefits collected by Living Magazine writer Judith Berger: Dandelions

- Restore health to over used topsoil
- Help digestion and enhance ‘movement’ in the intestine (bitter greens release hydrochloric acid in the stomach)
- Has a potent effect on the solar plexus, the liver, stomach and gall bladder, are strengthened by ingesting the choline in the plant’s leaves.
- Contains high levels of Vitamin A and C
- Ensures that honey is made and harvested into the fall (when most other flowers have died)
- Emits a gas that ripens fruit in orchards early and evenly.

Seems too good to be true that all this can be found in my back yard! On a sunny day in early May, I decided to give a dandelion salad and dandelion-root coffee a try.

I spent about a half an hour in my yard pulling out dandelions, root and all. It was tough work and my thighs were burning by the end as I gathered up enough plant to fill an 8-litre pail. After soaking the plants in clean water for a couple hours, I used a scrub brush to scour the roots. The leaves washed clean okay, but looked very spindly. There wasn’t a lot of flesh on these particular dandelions leaves and before I even started with preparing a salad, I tried a leaf. Spiny and tough and bitter, it left me no choice but to throw the lot of leaves out.

On further experimentation, the trick with the leaves is to find plants with no blossoms developed (best picked in the early spring). Also, the broader leafed the better. “Better’, though, is still very bitter. I find these leaves hard to swallow except when mixed with lots of other greens, buried in egg, ham and salad dressing. I still have to work out whether the leaves’ health benefits outweigh the cholesterol and fat consumed in such a salad.


I had somewhat better luck with the dandelion roots gleaned from my back yard. They mostly came clean and smelled freshly of carrot. In order to use them as a tea or coffee, first the roots must be dried. I placed them on a cookie sheet and put them in 170 degree F oven for about two hours- until they looked like dried mushrooms.  I let them cool, and then stored them in Mason jar.


Tonight I brewed the harvest. I used a small coffee grinder and ground the roots (not too finely). You can apparently brew this in a drip machine or percolator but I only had the option of a French Press. So I added my ‘grounds’ to the carafe (they smelled a lot like Ovaltine, which increased my optimism) and hot water then let it steep for five minutes. With great ceremony, my husband poured the beverage. First I tried it black. It was rather like healthy tea, in colour and in flavour. I added cream and sugar. It still tasted a lot like healthy tea- with an extra kick at my back tonsil as it went down my throat. 


The verdict: The flavour was pretty awful for my novice palate and a half hour of harvesting, plus half hour of scrubbing, plus two hours of roasting produced just four teaspoons of ground dandelion root- enough for two cups of brew. 


There are many recipes that at press time I haven’t tried- you can mix dried root with equal parts real coffee and add a dash of cinnamon. Or steep fall dug leave and roots in brandy for winter cordial. Or add blossoms to pancake mix. You can make wine, face wash, vinegar.

Considering the dandelion’s many benefits and my inexperience as a dandelion barista, take my take on the salad and coffee as a challenge: Try them, you may like them. And, if you do like them, please share the recipe or tricks with me on my blog at http://avenuehomesteader.blogspot.com! Because I really wish I could ingest dandelions without exercising my gag reflex.


Tuesday, April 27, 2010

Some Websites that are Worth a Look

There is an incredible amount of community action related to enhancing food security in Edmonton, as well as support for reconnecting to the earth and our neighbours. Check out some of the fun and creative ways Edmontonians are realigning their values and lifestyles to more sustainable models:

Traditional Skills Edmonton
Green Edmonton Blog
Operation Fruit Rescue
Just Food Edmonton Blog
City Farm

Make Your Own Beauty Products

On March 18, eighteen women gathered at the Alberta Avenue Community League to make soap, body butter, and a variety of spa products including oatmeal face mask, strawberry salt scrub, hand massage oil, and sugar rub. Hannah Barrington was the workshop facilitator.

Hannah dons her safety glasses and gloves, fully prepared to measure out the lye for our Olive Oil Soap. 

Olive Oil Soap is made of super simple ingredients (olive oil, water and lye), but the process is finicky- lots of careful measurements and temperature management is required. Add to that the corrosive ingredient lye and two hours of intermittent stirring- most participants agreed that they might leave soap making to industry. There were a few that are still committed to trying it.
 Hannah's super nurse skills were put to use on Becky's red, chemical burned skin. TIP OF THE DAY: If skin comes in contact with Lye, find a lemon or vinegar fast!
Glenda and Jen mix it up at our Strawberry Salt Rub station.
Strawberry Salt Rub Recipe:
1. Mash 3 ripe strawberries. 
2. Mix in 1 Cup sea salt and 1 teaspoon oil (of your choosing). 

Makes 1-2 rubs worth. 
Will keep in fridge for up to two weeks. 
Use to exfoliate hands, feet, or entire body, simply rub and rinse (CAUTION: this can make your tub really slippery).


Participants prepare to make body butter.

One of the easiest skin emollient products to create at home is the solid body butter bar. These are available commercially, often in the roll-up containers. You can make one's own in a jar, old lip balm pots and tubes, etc. 


Basic Butter Bar Recipe:

5 Tbsp Beeswax- buy this at the farmers market or a supply store
5 Tbsp Cocoa Butter- we found it really cheap online or get it from Planet Organic for a price.
5 Tbsp Almond Oil- available at most grocery stores

To make this even more cheaply- add equal portions of Shea Butter [buy it at any African beauty shop like those on 118 Ave] and/or Coconut Oil [buy it at most grocery stores]

1. Combine all ingredients together in a small saucepan and heat over medium heat until completely melted. Do not boil! If there are oil vapours, it is too hot.
2. Swirl saucepan to incorporate ingredients thoroughly and remove from heat.
3. Allow the melted mixture to cool slightly before pouring into mould or roll-up application container. Intensely hot liquid will melt or warp plastic containers.
4. Allow to cool completely before application, or removing from mould.
5. If it's too hard, simply reheat and add more oil. If it's too soft, reheat and add more beeswax.

To make lip gloss, add a little more oil in step 1. To colour, you can add some shavings from a nice coloured wax crayon.

For a little scent add 5-12 drops of essential oil after step 2 for desired scent.


The Oatmeal Face mask offered a great opportunity to pause and smell the cucumber. The ladies are soaking their feet in hot water infused with a couple mint tea bags.

Oatmeal Mask Recipe:

1. Grind 4 Tablespoons of oatmeal (coffee grinder will do- the finer the grind, the more likely the oatmeal's healing properties will be absorbed).
2. Mix 2 Tablespoons of honey.
3. Apply mask to face. Relax for ten minutes and rinse off with warm water.