An Avenue Homesteader

Thursday, April 28, 2011

Next Week: Soap Making and Body Butter

The makings of Body Butter
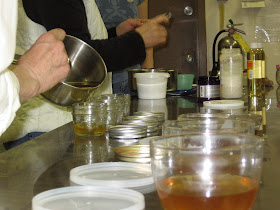
There's only a few more days left to sign up for a night of soap making with Hannah Barrington. Hannah led a similar workshop last year (you can read about it here).

I've been really pleased with the soap from our last workshop. After six months of letting it cure, the soap was mild, firm and really sudsy.  Hannah also made me a batch with essential oils that has made for nice showers.

Both the soap and body butter recipes are simple to memorize and execute. See below for the details!


Wednesday, May 4, 2011 from 7- 9 pm

If you've always wanted to move away from mass produced, chemical filled body products but don't know where to start, join Hannah Barrington as she mixes up a batch of gentle Olive Oil Soap and skin-honouring Body Butter. 

In this evening workshop, you'll make 10 bars of soap, exfoliating body rub, and learn how to make body butter (you'll take home a sample).

Fee is $25. RSVP to Carissa at carissahalton@hotmail.com and pay early to hold your spot. 

Tuesday, April 26, 2011

Sap Gum- Yum?

Here I am trying sap gum for the first time since I was seven years old. If you've ever craved the flavour "Christmas Tree", this is it. It's the smell of strong pine captured on my taste buds--- and it's a bit weird. But fun! And free! And sugar free! 
Hiking while on holidays in the Columbia Valley, BC last week, we came upon some crazy sap structures that spread like skirting on half-century old pines. Mat dared me to eat it. While usually I resist this sort of thing, the sunshine and fresh air perhaps made me bold.

I gathered about a tablespoon of hard sap from the pine trees and tossed them in my mouth like tic tacs.

I chewed for about two minutes before it completely softened like store-bought gum. 
I then proceeded to play with my gum. The flavour was strong even after fifteen minutes of hard chewing and stretching. It resisted my attempts to blow bubbles though.

Thursday, April 21, 2011

An Easter Project- New Life for an Old Chair

It's probably pathetic but there's not many feelings better then the heady rush of scoring a deal. Cheap thrill, I know. Perhaps it harkens back to my foremother's biological 'gatherer' instinct, perhaps it's thanks to the competitive nature of a bunch of cheap aunts. Whatever it is, I LOVE when I can announce (brag about?) a deal.

Like the Lululemon sweater I'm wearing: $3.99 at a thrift shop. Like my last couch: free from the back alley behind a VERY clean, respectable house by Kingsway mall. Like my 4 slice toaster: 90% off at consignment.

Yeah, the bragging can get a little wearing... but I mean no harm.

And besides, not all the things I score for cheap start out beautiful. Like this occasional chair from the 60s. I share this project in honour of the long weekend. And in honour of Easter, a celebration of the broken becoming beautiful. 

$10 got me a scratchy, stained chair with decent springs and great shape. It had already been recovered before so the fabric was easy to pull off. The skirt was the first thing to go!
I 'Spray 9'd' (glue in a can) the whole chair and added four layers of batting from the fabric store. This stuff is cheap and is a great way to add padding, shape and support. It's like a good push up bra to tired breasts. 

Madi's bum could not be photoshopped out of this picture, sorry about that! I laid the old pieces onto the new.

This is the main reason I go to the trouble of removing the old fabric. At first it seems simpler to upholster over the original material-- but while it may cut out a step it ADDS LOTS OF TIME at the fitting stage as one fiddles with size and cut!

The bottom piece goes on. Notice I removed the legs to staple the fabric on the bottom then was able to cover the staples with the leg piece. It's a cleaner finished look--- it also is easier to work without the legs flailing about at the stapler.

The most difficult part in recovering furniture is making neat folds in the fabric, like here on the front corners and back edges.

While I didn't take a close up, the finished chair has a couple brown buttons on the top section that I added BEFORE the back piece went on. If you peer carefully at this picture (taken before my fancy camera entered our home!) you'll notice the hammered nails lining the bottom of the chair. I love the look of them but they were a PAIN in the derriere to put on straight. While they probably DOUBLED the time this project took me, I still am telling myself they were the finishing touch.

Calculating all my materials: glue, nails, material and initial investment for the chair, this project cost $50 and took about 8 hours (3 of those hours were comprised of swearing at nails).


Tuesday, April 19, 2011

BOARD MEMBERS NEEDED: AB Ave. Community League AGM Tonight

The Alberta Avenue Community League does some phenominal things in our community-- they have a great facility, host the farmer's market, coordinate community events like the Penny Carnival and Blooming Garden Show, facilitate affordable fitnesse and family programs like Tai Chi, Yoga, Pre-school gym classes.

Community Leagues are vital for the health of our neighbourhoods and bring a great amount of networking opportunities for volunteers.

If you have a couple nights a MONTH available to donate to a worthy, fun cause- consider putting your name forward at the Alberta Avenue Community League's AGM tonight. Here are the details!

Annual General Meeting


Tuesday, April 19 at 7pm


Lutz Room - 9210 118 Avenue


AGENDA:
-Annual Report
-2011 Budget
-Adoption of new bylaws
-Elections of new board members

And of course snacks, visiting and time for your input.

Saturday, April 16, 2011

Forget Peat Pots: Making Them Old School

My house in 2010. It became rather unmanageable- and dinner was eaten in the living room.
This is the time when our house decor models that of a jungle. It's a disorganized, poorly lit greenhouse, without enough surface space to manage all the growing (soon to be leggy!) seedlings. This year I have stayed true to my goal of control in the planting stage: I planted 2 butternut squash, not a flat, just 8 tomatoes, not 3 flats. My problem is that in my anticipation for all things warm, green and delicious, I forget that seeds will grow into seedlings which will require transplanting which will require FOUR times the space of the initial planting cells.

If you are wondering about my pots in the above picture- they are newspaper pots. I first got the idea of make my own transplant pots (instead of buying peat or coir) while browsing the Lee Valley Catalogue. For about $30 you could buy a wooden mold "for newspaper pots"! Thankfully I resisted buying the mold and rummaged for a plastic cup in my kitchen. It proved to work fantastically.

Rolling each pot adds about 8 seconds to my transplanting time per seedling. In return, I save about 10-15 cents a plant and reuse materials that are renewable (peat is a non-renewable resource so why use it when not necessary?). I also find that the newspaper pots decompose way faster than coir or peat pots when transplanted out in the garden...

For me, it's been worth the extra time. Here's how I do it:


Cut a 4-6" section of newsprint or a large newsletter (like below). 

With two layers, roll the strips around a plastic cup or mold that's 3- 5" tall


Place top-end down and fold the bottom like the ends of a present- I usually begin folding the loose edge.

Squash the boom flat with the mold or cup.

Add soil immediately (which helps to weight down the folded bottom).

Then add your seedling.


I place mine on cookie trays, with slightly raised edges, so that the seedlings have a firm AND waterproof base. This means no cookies in our home for the month of April (a month when I don't particularly need cookies on my lips or hips!)

Water the tops gently and I add water to the bottom so the pots soak water from the base. Snuggled together like this, the pots hold their shape well.

In past years, I've usually placed tomatoes in the bottom half of pop bottles. This year, I simply transplanted them into a roasting pan (no turkeys will be cooked this month either!). I ran out of dirt but will fill this pan to 1" from the top.

I always plant my tomatoes as deep as I can. New roots will grow from whatever part of the stem is under soil. You can even plant leggy tomatoes sideways in the garden, leaving only the top couple leaves showing. New plants will grow up from the roots where leaves once grew.
 
If you have yet to start basil and parsley, these can be yours to baby. I have no room for these little gaffers. Email me if you want them.

Thursday, April 14, 2011

Yogurt Cheese: Spreadable Deliciousness

Now that I'm feeling pretty confident with making yogurt- and am churning it out by the litre full- I decided to try my hand at yogurt cheese. Past experiments have been unexplained, sorry failures (it looked like yogurt before and after the experiment!).

The following process, a really really easy one from Mother Earth News, worked! The by-product of essentially STRAINED YOGURT, was a creamy, stiff spreadable cheese. Since I used homemade yogurt it was easily 1/3 of the price of cream cheese, and the prep time was under 5 minutes.

Here's how I did it:


Layered 4-8 layers of cheese cloth (found at dollar and grocery stores) in a pasta strainer and put the strainer on a pie plate. 
 Poured plain  (you can use flavoured) yogurt into the cloth covered strainer: I got about 1/2 the measure of cheese from 1 part yogurt.  


Covered the entire thing with a plastic bag and put it in the fridge overnight. The whey strained out and settled in the pan.

NOTE: I have a friend from Greece who simply wraps up the cheese cloth around the yogurt and hangs it above the sink. 

I still need to experiment with using the whey- I've read you can put it in bread, use it watered down as a liquid fertilizer, add it to shakes, feed it to pets... but I haven't tried any of this yet! Any uses for whey that you know of?

And lining the strainer is cheese! Look how stiff it is- it holds its shape, but is more spreadable than cream cheese.

Here I served the cheese with olives and pita. About an hour before serving I had mixed in oregano, lemon juice, worcester sauce, and pepper. On another occasion I mixed it with hot pepper jelly. If you do it, let me know what other spice mixes you try to add to my repertoire.

Tuesday, April 12, 2011

Wanna Manage a Farmers' Market??


Want to get involved in building local food networks? Want to be part of the revitalization of Alberta Avenue? Do you have 10- 15 hours a week for paid work? 

The deadline is April 15, 2011, so apply soon!


Market Manager Job Posting


The Alberta Avenue Farmer’s Market has been operating in the Alberta Avenue Community League for the past two years. Twenty to forty vendors participate in this weekly, year round market.

We are in need of a part-time market manager to work on a contract basis for 10 to 15 hours a week.


Duties:
-       Oversee market day from 4 to 9 pm Thursdays includes: set up, take down, volunteer management, and collection of fees.
-       Recruit, support and retain vendors
-       Oversee the marketing plan including advertising in multi-media and working with steering committee.
-       Facilitate volunteer-led special events.
-       Work with Steering committee to recruit and facilitate volunteers
-       Budget oversight
-       Administrative duties as required.

Qualifications:
-       Interest in and passion for accessible local food
-       Strong interpersonal and conflict resolution skills
-       Strong organizational abilities
-       Ability to work independently
-       Experience working with boards
-       Previous experience with Farmers’ market management would be an asset.
-       Work in Alberta Avenue community is an asset.

Please send cover letter and resume to market@albertaave.org by April 15, 2011.

Tuesday, April 5, 2011

Hummus from the Blender's cheap cheap cheap

I was seven years old at my hippie Sunday School teacher's house when I first tried hummus. It was Passover and I wore a pink dress my mom had made me. Lace bordered the top collar and I worried the strange dip would drip from the warm pita onto my lap.
While it wasn't love-at-first-bite, hummus is now found at most of the parties I host- and its become a staple for many folks wanting a low fat, protein snack. I love it with lots of garlic and lemon. 

Buy it at the store and a small 1 cup container will set you back $3-4. I can make 4 cups for the same price. Here's my recipe:


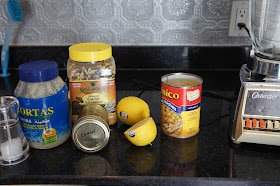
In a blender or food processor put*:
- 2-4 T of lemon juice (fresh or concentrate)
- 2-4 t of garlic
- 1/4 C of tahini (ground sesame seeds) found cheap at the Italian Centre or Superstore. Substitute peanut butter for an interesting variation. 
-1- 2 cans of undrained chickpeas. Substitute black beans for a nice and unique alternative
-1- 2 t of cumin

*I find that if I put the liquid ingredients in first, the blender has a much easier time blending the beans.


Blend everything until smooth. Add lemon juice, oil or water if it's too thick to blend. Add another can of beans if it's too liquidy. Taste and add flavour - cumin, garlic, lemon juice- as you like it. I sometimes will add curry powder or onion powder. Roasted red pepper is also a nice variation.


Serve drizzled with olive oil and a couple shakes of paprika. When its the season for parsley or coriander, I'll often chop these up and sprinkle on top; if you want it more liberally flavoured, mix it in.

Beautiful, isn't it?